User:Dguyj
Welcome
This landing page serves as a stash for any ideas/article drafts I might have. Feel free to contact me on Discord (Username: teinc3) for anything you would like me to add/change in the wiki.
Useful Links
Guide to Polygon CP
See also: Polygon, Control Points, Guide to CP
Introduction
Polygon CP has been one of the more popular and iconic battles on ProTanki, in which a total of 16 players forms 2 teams each and wrestle control over the only point located at the center of the map. The following guide aims to introduce the tanker to identify scenarios they might face in battle and to improve their gameplay in the gamemode.
Responsibilities and Archetypes
Polygon CP is a team-based gamemode and every player must both play and coordinate well with their teammates to secure a victory. This includes selecting a proper tank combination and performing a certain responsibility within the team, referred to as an Archetype.
Suppose that everyone in the red team uses a melee turret and fast hull to rush at the point. If the Blue team puts up a few Thunders, the Reds will not be able to hold the point at all, as they will die preemptively to splash damage. However, if every blue player camps at their place and refuses to go to the point at all, red will still win the game. This example illustrates the importance of equipment diversity within a team. When every teammate has a different turret and thus a different purpose within the battle, the enemy cannot adapt by using the same countering strategy for all players.
The following sections outline the typical responsibilities for each player, categorized into major groups with similar purposes.
Note that the responsibilities below are only rough generalizations of a player's purpose of contribution within the game. Certain groups may be over/underrepresented or even absent from the battle, depending on the number of players who are fulfilling such a role.
| Tunnel | Control | Beatdown | Siege |
|---|---|---|---|
 |
 |
 |
 |
Tunnel Group
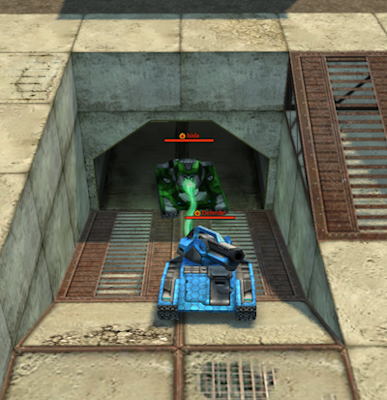
The Tunnel Group consists of a Defender and 1-2 supporting Isidas. They occupy the tunnel just beneath the Control Point and use it to defend the point from enemy occupation.
The Defender equips a short-ranged turret mounted on a heavy hull. It is stationed near the entrance of the Tunnel and shields the tunnel Isidas from enemy fire. The tunnel Isidas, in turn, replenishes the health of the Defender and other accompanying Isidas continuously.
Control Group
The Control Group are players tasked with attacking and occupying the point from enemy control.
Players in the Control group equip short-ranged turrets, and depending on the situation, medium or heavy hulls.
When a tunnel Defender is at critically low health, it can swap positions with a Control group player with decent HP, so that the tunnel always remains fully defensible.
Beatdown Group
The Beatdown Group consists of players with medium-ranged turrets equipped on heavy hulls.
Unlike Control players, Beatdown players do not actively go towards the point, but instead position themselves at choke points near the control point.
When the point is under allied control, they will engage approaching enemies or campers and attempt to pick fights to distract them from going towards the point. If the point is currently occupied by the enemy and under assault by teammates, they will assist in attacking it and at times move towards the point to absorb damage from enemies.
Siege Group
Siege Group players, colloquially known as “Campers", position (or entrench) themselves in hard-to-access locations. They continuously dish out large amounts of damage on enemies from these positions.
Campers are often criticized in battle for their “lack of contribution" as they often do not go to the point. However, this is false, as siege players are mainly responsible for damage output, and the responsibility for occupying the control point goes towards the Control group and occasionally Beatdown group.
Most camping turrets are single-targeted and mainly attack enemy campers and tanks approaching the point. Thunder is the lone exception as it leverages splash damage on crowds of enemies. Instead of focusing on enemy campers, Thunders mainly attack enemies that are grouped together and/or assaulting the point.
Turret Profiles
See also: Turrets
The following section aims to explain the specific responsibilities each Turret should cater to within the battle.
Firebird
- Control Group
Suitable Hulls
- Hunter
- Viking
Analysis
Firebird is particularly effective on damaging groups of heavy hulls due to it having the highest scaling damage in the game. When positioned correctly, it can be used to plow through clusters of enemies at the center and inside the tunnel.
Firebird can also use its mobility to sneak up on unsuspecting campers and distract them. It is very difficult for enemy campers to survive the engagement due to afterburn.
Freeze
- Control Group
Suitable Hulls
- Tier 1: Viking
- Tier 2: Hunter, Titan
Analysis
Like Firebird, Freeze can deal with large groups of heavy hulls with its large damage. However, Freeze's main purpose is to neutralize campers by distracting and freezing them to unresponsiveness. The freezing effect can also be used to slow down enemy Control groups from rushing towards the central point, where they can then be singled out by allied teammates.
As Freeze has a much larger ammo clip than Firebird, it can deal damage for a longer period, and therefore needs more HP to survive to unload a full clip. In addition, Freeze's slowing effect allows the player to trade off excess speed in exchange for more health, stability and maneuverability (required to circle around enemies). Therefore, Viking is a good choice for Freeze.
Isida
- Tunnel Group
Suitable Hulls
- Tier 1: Viking
- Tier 2: Hunter, Dictator, Titan
Analysis
TBC (Main focus: healing allies with large ammo clips)
Hammer
- Tunnel/Control Group
Suitable Hulls
- Hunter
- Viking
- Dictator
- Titan
Analysis
TBC (Main focus: Knockback/Burst damage)
Twins
- Tunnel/Control Group
Suitable Hulls
- Tier 1: Titan
- Tier 2: Viking
Analysis
Twins is a short-range turret that has infinite reload, easily topping other turrets for the most damage dealt under a sustainably long period.
People often believe that Twins is a "low-skilled" turret, often referring to the analogy that Twins players just place a brick on their Spacebar to win. However, do not be fooled by this metaphor - Twins projectiles rapidly depreciate in damage as its travel distance increases, making medium-ranged combat much less effective. Combined with the fact that Twins projectiles travel slowly and can easily miss their target, we find out that the amount of damage dealt in practical combat is not as much as when compared to its theoretical limit.
Twins, when surviving for extended periods of time, can continuously dish out large amounts of damage. This is a feat that most melee and short-ranged turrets cannot beat - Firebird and Freeze may give a much larger instantaneous DPS, but they will eventually run out of ammo some time.
Due to Twins’ range constraint, it must be positioned near the control point for maximum damage, and therefore is a good candidate for defending the tunnel. In addition, supporting Isidas will constantly replenish the health of Twins, so that it can continuously shoot bullets at enemies and dismantle assaults easily.
It is rather difficult to find a hull that can provide a balance of all stability, excess health and speed, qualities that are crucial for Twins to unleash its maximum damage potential. Consider that Mammoth moves way too slowly, Dictator is too unstable for Twins projectiles to land accurately and Hunter has too little health for sustained shooting. This gives Titan and Viking as the only two viable hulls that Twins should be mounted on.
Twins is much less effective when facing hulls with more mobility, as projectiles can be dodged easily. To improve aiming, consider using Mouse controls. This allows the turret to reposition itself to where the cursor is at and continue shooting in the direction of the enemy. This also helps alleviate the problem of getting your aim knocked off when facing turrets with high impact force such as Hammer, particularly when using a medium hull.
Ricochet
- Beatdown/Tunnel Group
Suitable Hulls
- Viking
- Dictator
- Titan
- Mammoth
Analysis
Ricochet is often thought of as an upgrade from Twins. It has much greater range, similar burst damage and most importantly faster bullets that hit accurately, with a limited energy clip being the only tradeoff. People that equip Ricochet usually get good scores at it doesn't take too much skill nor effort to put this weapon to great effectiveness.
Ricochet can be used to aggressively attack and occupy the point similar to Twins, but it can also leverage its range to hit other enemy campers or use its bouncing shots to hit Isidas deep inside the tunnel. This ability gives their team the most valuable asset by being able to dislodge enemies from the tunnel. Note that Ricochet is only effective at dealing with a single Isida in tunnel. If there are multiple Isidas inside the tunnel, they can heal each other, preventing the Ricochet from destroying them before it runs out of ammo which greatly reduces DPS.
| Attacking Tunnel Isidas | |||||
|---|---|---|---|---|---|
| From the point | From the opposite side | From the tunnel entrance | |||
 |
 |
| |||
| Attacking Cliff Campers | |||||
 |
| ||||
| Attacking Top Campers | |||||
 |
| ||||
When engaging in a one-on-one fight against an enemy Isida with full health, try to first ignore the Isida and aim a few shots at other enemies. The Isida will start attacking you and drain some of your health, but the vampire effect will not work in its favor as it is already at full health. Start attacking the Isida with your entire clip when it will soon run out of energy. In this situation, the Isida will not be able to replenish its health effectively, and your burst damage would decimate it quickly.
Smoky
- Beatdown/Siege Group
Suitable Hulls
- Tier 1: Titan, Mammoth
- Tier 2: Hunter, Viking, Dictator
Analysis
Smoky is usually mounted on a Heavy hull so that it can act as both a Beatdown and Siege unit at the same time. Smoky can be played with using a mobile playstyle, and so a Medium hull is also recommended, but they are usually reserved for turrets with larger damage per shot such as Thunder, Railgun and Shaft.
Due to Smoky's good range, fast reload and decent turret rotation speed, it can function well in both close-quarters and long-ranged combat. Along with Shaft (in Scope), Smoky has the ability to pick fights with a full-health melee enemy and survive with little health remaining. It therefore does not have to prioritize an escape when encountering them.
Both Smoky and Hammer have a large impact force, but it is the likes of Hammer pellets that attract the most attention from enemies, not Smoky shots. Enemy Railguns often refuse to initiate shots near a Hammer out of fear of their aim being knocked off, but this behavior becomes uncommon when facing a Smoky. Thus, a skilled player with good aim can focus on attacking the edges and corners of enemies, so that their shots get thrown off.
When facing off versus an enemy Smoky, Thunder or Shaft (in Arcade mode), try to time your shots so that your shot is ready moments before theirs. Then, aim at their hull's corners to knock their impending shot off. Repeat this multiple times and aim at alternate corners so that they keep missing their shots.
Sometimes it is recommended to skip a shooting cycle and tank a shot from the enemy so that you can re-time your shots properly and adjust your aim meanwhile. Beware of issues related to ping/latency and try to be unpredictable. You can use mouse controls for better aiming.
Thunder
- Siege Group
Suitable Hulls
- Hunter
- Viking
- Dictator
- Titan
Analysis
Thunder is usually played as a Siege group turret, but it is rather different compared to other turrets in the same group, as Thunder is multi-targeting while others are single targeting only.
The main objective of Thunder is to deal as much damage to as many enemies as possible while surviving for a long period of time. As its radius of splash is much larger than the narrow cone of splash in melee turrets such as Firebird and Freeze, the presence of a Thunder focusing the center will make any coordinated assault by the enemy on the control point much more difficult.
Thunder is usually played as an assisting turret that dishes out damage, and hence there is no need for it to go towards the point. However, some players may prefer to play Thunder using a Beatdown style. But this is highly ineffective, as the thunder is much more likely to succumb to enemy attacks (due to its exposed position), and self-damage from close combat neutralizes its effectiveness.
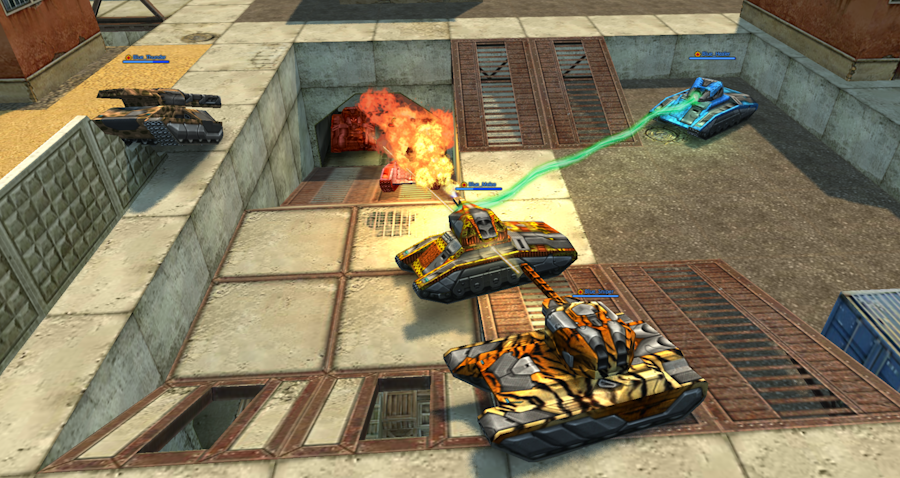
Constantly look out for groups of enemies that are clustered together. Then, attempt to shoot at the exact center of the group. This will cause all enemies to lose some health unless they recognize the threat and move away from each other.
The decision on whether to shoot a cluster of enemies far away from the control point or to shoot a single enemy at the control point still remains disputed. If the group of enemies are moving together (presumably to the point) with no sign of dispersal, shoot at them first. Otherwise, you might want to finish the lone enemy at the point first.
Remember that Thunder is used to damage multiple enemies at once, not isolated campers. They are the responsibility of other turrets. As Thunder, you will be outmatched by other turrets on a one-on-one basis. Avoid shooting at enemy campers, unless you are certain they will not retaliate against your attacks, or they are low in health and can be destroyed.
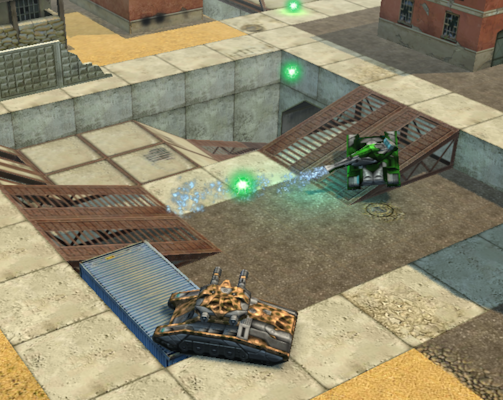
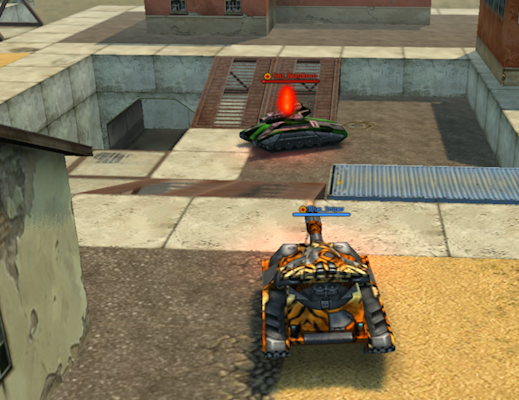
The following image shows an ideal Thunder shot utilizing splash damage effectively:

Thunder can be mounted on different types of hulls, either medium or heavy. These are used depending on different circumstances:
- Medium hull: Used when the enemy uses a lot of short-ranged turrets such as Twins or Freezes. Medium hulls such as Hunter provide enough speed to out-maneuver enemies. High speed allows for Hull Rocking allowing for better Vertical aiming angle. Also known as Moving Thunder.
- Heavy hull (Titan): Used when the enemy uses a lot of long-ranged turrets or those with high Knockback such as Smoky and Hammer. Speed is less effective as you can't usually outmaneuver a long-ranged turret. In this case, a heavier hull provides better stability and horizontal aiming. Also known as Static Thunder.
Playing a medium hull requires substantially more effort and energy than playing a heavy hull, but when played correctly can yield much greater rewards (by being able to survive for much longer). An ideal playstyle would involve “Hit-and-run" tactics, where the player lands shots and then gets out of sight of enemies to prevent retaliation. The player would also have to constantly look at surroundings and escape when threats are incoming.
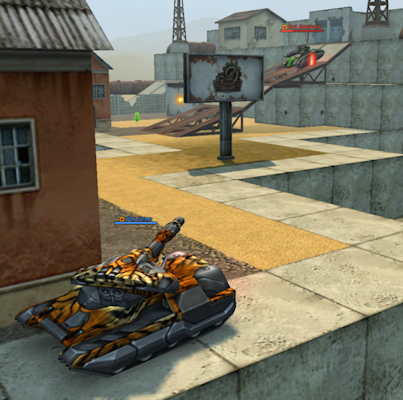
If playing a Heavy hull, note that your movement options are extremely limited. Attempt to camp near the Top, the bridge or the house near the billboard, as these are positions which can both oversee the point and are relatively hard to reach for enemies. Avoid camping near the Island (opposite side of the Cliff) as it is too far away to the point where the majority of enemy clusters form. When provoked by enemies with short-range turrets, position yourself in direct sight to the point so that you can keep shooting at prioritized targets.
A more detailed strategy guide regarding good camping positions and escape routes can be found further into the guide.
Vulcan
- Siege/Beatdown Group
Suitable Hulls
- Tier 1: Titan, Mammoth
- Tier 2: Dictator
Analysis
TBC
Railgun
- Siege Group
Suitable Hulls
- Wasp
- Hornet
- Hunter
- Viking
- Honorary Mention: Titan
Analysis
Railgun has the second largest damage per shot in the game, only behind Shaft in Scope mode. This makes Railgun a siege group turret, focusing on primarily delivering high damage punches to heavy hulls by draining most of their health such that they can be finished off by teammates.
Attempt to identify enemies with around the same or significantly more health than a Railgun shot, or ones that are lined up vertically so that a shot can penetrate all of them at once. Beware that damage may be wasted when shooting at an enemy already at critically low health. The possibility of missing a shot is also highly likely due to Railgun needing to warm up before firing a shot. With Railgun having a lengthy reload, missing a shot will only dampen your team's effectiveness, and so spending time planning your targets and shots ahead is highly recommended.
Having a good position is crucial for Railgun so that it would be able to grasp opportunities to attack multiple enemies at once through penetration damage. As Railgun is virtually defenseless when reloading, it also needs to prioritize an escape when facing all types of enemies. With positioning and mobility being the number 1 priority, Railgun is best mounted on a Medium or even Light hull, with the latter being the only time someone should mount a Light hull in Polygon.
Shaft
- Siege Group
Suitable Hulls
- Tier 1: Hunter
- Tier 2: Viking, Titan, Mammoth
Analysis
Unfortunately, Shaft in Polygon has one of the steepest learning curves out of any turret in the game, and most players that use it often lack in-depth knowledge on how to operate the turret to its finest in such a battle setting. The mere mention of using Shaft in Polygon is often ridiculed as a joke or frowned upon by teammates when the player is serious about its usage.
Like Railgun, Shaft is indisputably a siege turret and so the main objective is to stay alive as long as possible so that you can deal as much damage to enemies. Similarly, damage should be dealt to critically drain enemies' HP so that they can be finished off by teammates with ease. There is usually no need to go to the center where the point lies, as Shafts do not typically do well in close-range combat.
Shaft is unique in that it has access to two different modes: Scope and Arcade. Scope shots deal the most damage per shot out of all turrets in the game, and are reserved for dealing with high HP enemy hulls, as scoping a low HP enemy just wastes your ammo (energy). Arcade shots deal smaller fractions of damage for faster recharging and are used to finish off enemies with less health.
After respawning, you should have full ammo and can immediately start a Scope shot. Identify an enemy with sufficient health so that little to no damage will be wasted, then unleash a full Scope shot at it to wipe out most of its health. Depending on the enemy archetype, you may want to keep putting follow-up shots until the energy bar refills, then repeat the process by making another Scope shot.
| Scope Shot | Arcade Shot |
|---|---|
 |
|
 |
|
Always attempt to destroy enemy campers completely as they are effective at all ranges, and which can also retaliate against you. However, you should try to leave some health left for enemy Beatdown and Control units if they are far from the point or any teammates. After wasting time traveling across the map, they will arrive at places of interest, in which you or your teammates will make the final death blow before they have a chance to do anything at all.
Shaft, like Railgun, can deal damage to multiple enemies lined up in a row. When aiming in Scope mode, try to identify enemies situated right in front and back of each other, then move the crosshair accordingly so that the shot penetrates all of them.
It is much harder to hit multiple targets when in Arcade mode due to auto-aim, but it can still be worthwhile to perform.
When Shaft enters Scope mode, it has to remain stationary until firing the shot, potentially exposing itself to enemy fire knocking off its aim. With stability being the number 1 issue, Shaft does not pair well with light hulls unlike Railgun. Note that mobility is also an important factor for positioning and escaping, encouraging the usage of Medium hulls. Despite this, Shaft on a heavy hull can also be effective, as it is durable enough to withstand attacks before a fully-charged scope shot decimates the attacker.
The Ultimate Guide for Campers
Escape the Top
Imagine camping at the top of the cliff, railing enemies one by one casually. And then comes a Firebird out of nowhere, burning you to a bright red and you perish in seconds. For an inexperienced camper who just got used to the open field the top has over much of the map, this might initially seem annoying to deal with. However, fear not! By knowing your options and planning, you can proactively dodge these nuisances and continue your fruitful camping journey!
Precautions
As a camper you should be highly proficient in aiming and spotting enemy targets, and not just in front of you but also those behind or on the sides.
By using Mouse Controls, you can use the Right Mouse Button to lock your turret in place while moving your camera to scan the environment and detect possible threats. Locking the turret rotation to keep facing the front is particularly useful as Camping turrets usually have low turret rotation speeds - it takes much time to rotate your turret to scout your flanks and then back front.
If you find an enemy close-by moving in a non-standard way, observe it carefully as there is a possibility that it is taking a detour to attack you from your flanks unsuspectingly. Act if needed.
If camping at the top of the cliff, you may also want to consider positioning yourself close to the edge of the cliff. When an enemy is spotted approaching the flanks, a decision can then be quickly made to jump down the Cliff (see next section for a detailed implementation) and escape without harm.
Disengagement
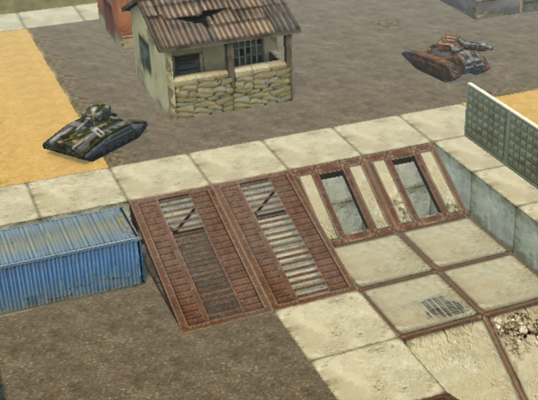
The following image shows some possible escape routes in which a camper can take:
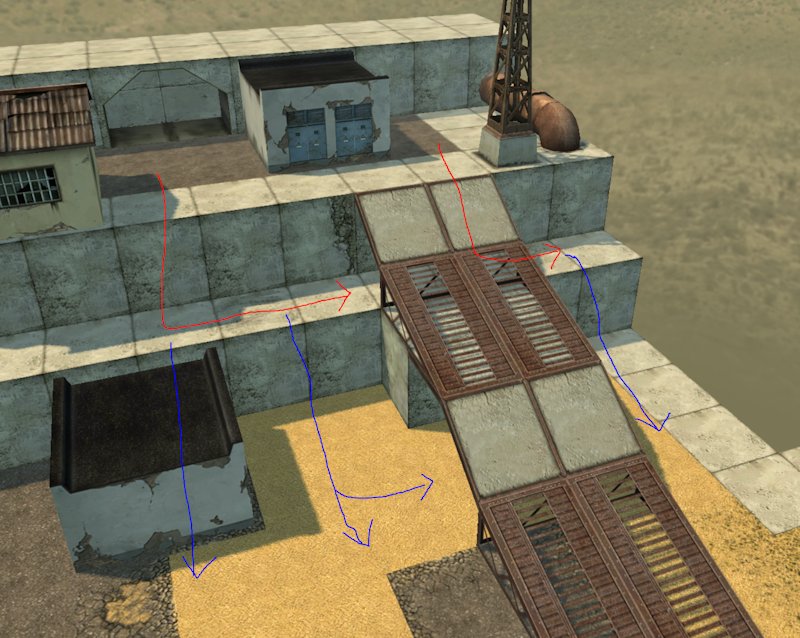
This disengagement plan should be foul proof if performed immediately after identifying the presence of an enemy.
However, if the enemy shoots you in the air with a turret with high knockback (such as Twins, Ricochet, Hammer, Smoky or Railgun), there is a significant chance that you will end up flipping over. In this situation, avoid jumping directly over the cliff or take a detour by dropping off from the bridge onto the cliff.
Abandoning teammates
Suppose one day you and your teammate are camping on top, shooting at enemies attacking the control point. Suddenly a Firebird spawns behind you and poses itself to attack you. You immediately jump off the cliff and land to safety, but then the Firebird goes to attack your teammate who perishes in seconds. You ask yourself: Should I have left my teammate to demise, or should we have ganged up on the Firebird together? It's a good question to think about, but the answer is more complicated than it seems.
Thunders are highly fragile in close combat due to self-damage, and are much more valuable on the battlefield than other camping turrets (due to splash damage), and therefore, their escape should be prioritized to ensure maximal survivability and control over the central point. Other turrets like Smoky and Shaft (in Scope) can shut down medium-hulls relatively easily, and so can initiate a combat directly against the enemy, acting like a Beatdown unit. Vulcan's gyroscope makes it hard to control in close combat, and it has a slow turret rotation speed, but its high damage and hull combination with a large pool of health might allow it to survive a melee fight with some health remaining.
Frontier and Backend Positions
Different siege turrets function under two effective ranges and each have different purposes. Close shots should target enemies assaulting the point. One shot gives less damage and is used to deal the final death blow to the enemies. Examples include Thunder and Shaft (in Arcade mode). Long shots should target enemies further away from the point and are used to trickle away their health as each shot gives much more damage. Examples include Vulcan, Railgun and Shaft (in scope mode).
Close shots, as its name implies, require positions that are relatively closer towards the control point, as the shots need to be directed towards enemies on or near the point. Long shots, on the other hand, do not require such close positions - they are dispersed far away from the map, as the camper only needs to damage reinforcing enemies that are approaching the point, without having to attack enemies near the point at all.
Note that the top area provides significant elevation to the camper and therefore negates the issue of close shooters being unable to target enemies near the point due to insufficient height. In fact, the top area is often populated by multiple campers at once, due to these favorable conditions.
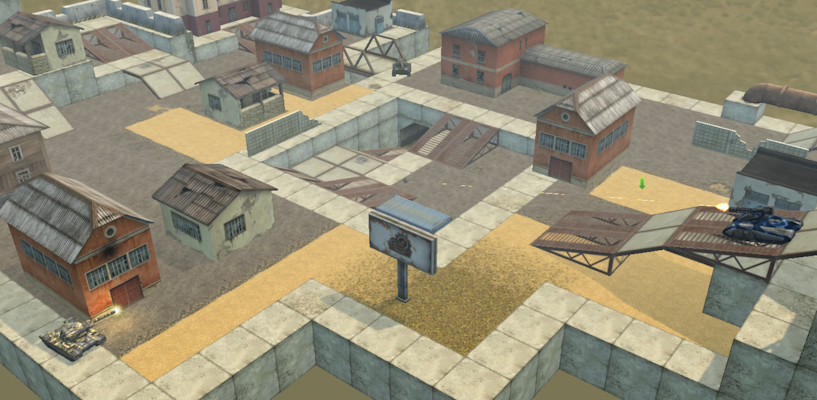
The map below outlines some ideal camping spots for both Close and Long-Shooting Siege turrets:
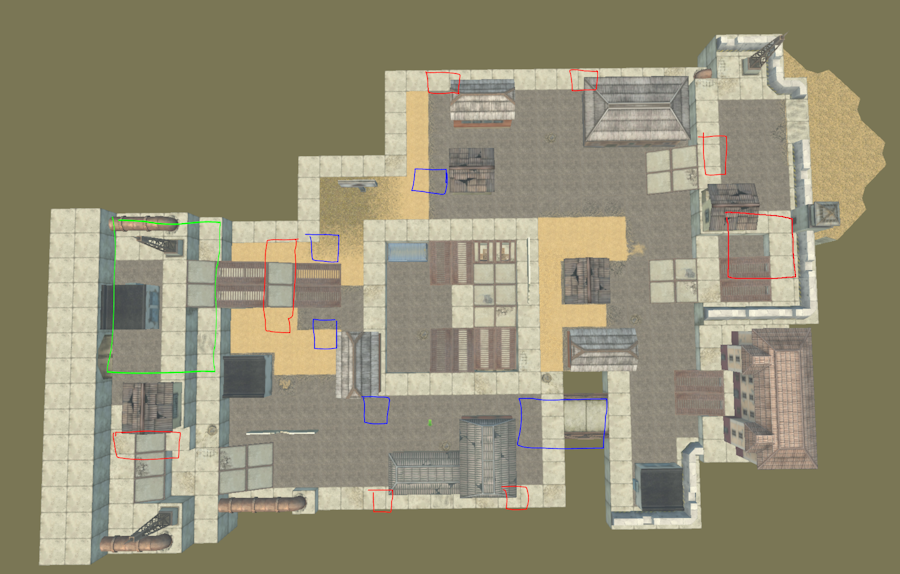
Legend:
Long
Short
Top Area
Hull Height
Readers may notice that both Hunter and Viking have similar statistics. Hunter has slightly better speed, and Viking has slightly more health and stability. Players are more likely to believe that Viking has relatively more benefits than Hunter, and thus commit to it when selecting a Medium hull.
However, many people fail to realize that the height of the hull is also an important characteristic when factoring in the optimal hull choice. And in Polygon CP, where control over a single area situated slightly beneath ground level is absolutely crucial, the difference in height can have a significant impact on the playstyle of each turret.
Viking has a significantly lower height compared to Hunter. When situated in a Long-Shooting position, the turret is unable to propel shots into the center, and can only attack enemies on the ground level. Hunter, on the other hand, gives a small height boost, which allows siege turrets to aim at tanks inside the sunken area where the point lies at a better angle.
As a Railgun player’s main objective is to deal heavy damage to full-health tanks continuously and not to finish off weakened players near the central area, height is not a concern allowing Viking’s other qualities to shine. However, Thunder’s splash damage and Shaft’s arcade shots are usually aimed within the depressed point area, and therefore, having enough height to aim shots afar gives Hunter the edge in this scenario.
These qualities can prove useful for other melee turrets as well. When positioned on the edges of the point (at ground level) and attacking enemies at the point (at the depression), the Firebird and Freeze damage cones get into closer proximity with the enemies when using a hull with a lower base height. This dishes out more damage to the enemies and is the main reason why Viking and Hunter are preferred more often than Dictator when using melee turrets.
Tunnel Interactions
Holding the Tunnel
When the tunnel is under attack by enemies, the Defender can attempt to hold the point and stall the enemy offensive due to the tunnel entrance being near the control point.
Note that the Defender usually has a heavy hull mounted, and when destroyed can take a significant amount of time before returning to the tunnel. Therefore, it is usually the best option for the Defender to retreat into the tunnel when the enemy offensive is too overwhelming. When reinforcements from teammates arrive and the coast is mostly clear, it can then come out of the tunnel to recapture the point.
Tunnel Isidas, on the other hand, usually equip Viking due to its high mobility and moderate health. When a tunnel Isida is eliminated, it can then traverse swiftly through the map and re-enter the tunnel, recreating a proper defense.
Viking's low height allows for a small enough hitbox. This, accompanied with a large hitbox of the Defender's heavy hull, allows effective protection from enemy fire. The Defender should also reposition itself when needed to provide maximum shielding for the tunnel Isidas. Still, there might be select circumstances where it is better to allow Isidas to take the hit, as they are easily replaceable and often have more than enough HP to spare.
Attacking the Tunnel
Under most cases, gaining control over the tunnel gives a decisive advantage for their team. For the other team, it becomes crucial to dislodge the tunnel of enemy defenders.
In general, the difficulty of dislodging a tunnel depends on the number of supporting Isidas present in the tunnel, as the more Isidas there are, the harder it is for the tunnel to be cleared. However, overcrowding of the tunnel may result in a less efficient defense formation, and it allows splash damage to affect many tanks at the same time.
The more supporting Isidas there are, the lesser the damage that can be dealt by reinforcing enemies. The pace of enemy reinforcement simply cannot outmatch the pace of friendly reinforcement, making it much easier to neutralize the tunnel and occupy the control point without having to completely dislodge it from enemy control.
Prerequisites
When attacking the point, many teammates will coalesce together, which makes splash damage particularly effective in shutting down massive pushes. The Defender may try to lengthen the time the attackers need to capture the point, and in doing so, the attackers sustain much more splash damage causing the attack to die down faster.
Before mounting an assault on the point, be sure to destroy or neutralize enemy Thunders. Position your hull in front of them to block their shots so that they get self-damaged and die. Allow the Thunder to sustain as much self-damage as possible while you attack other enemies, until you dip below 50% HP, then switch targets on the Thunder and destroy it. When the Thunder respawns, the fight for the tunnel would most likely be over, and it would likely be placed in a terrible position that disallows hitting friendly point assaulters. You should also prioritize all approaching Firebirds and Freezes so that they cannot contest the point while wreaking havoc on the assaulters with their cone of splash damage.
If difficult to reach, it is possible to ignore single hitters like Vulcan and Railgun altogether, but a better approach is to distract them into a dogfight with another tank that is much further away from the point. This ensures that the enemy's supporting fire cannot be used against the tunnel assault team. The tunnel defenders cannot receive reinforcements and will quickly die.
Single Isida
A lone Isida in the tunnel cannot heal itself, making it much harder to stay alive when sustaining enemy fire. With only a Defender and an Isida, the tunnel becomes much more spacious and navigable to dropdown assaults as well as Ricochet projectiles. Thus, the general objective is to first destroy the supporting Isida before destroying the Defender.
A player with Ricochet can aim its shots at the edges of the tunnel so that the projectiles bounce deep into the tunnel and damage the Isida. Even by equipping paints with protection against Ricochet (such as Nano or Clay), the lone Isida will still succumb quickly.
If there is only one Defender and one supporting Isida, one side of the tunnel is usually exposed. Smoky, Thunder and Vulcan can then shoot into the tunnel flanks from surface level, damaging the Isida.
A player may also equip Hammer or Twins, fall from the top of the tunnel entrance, and deal burst/sustained damage to the Isida. The Isida is usually unable to damage the player and heal itself, as it has spent most of its ammo/energy on healing the Defender.
Multiple Isidas
When there are 2 or more supporting Isidas in the tunnel, it becomes possible for them to heal each other even when sustaining enemy fire. The Defender can also receive twice as much healing support, making it much harder to destroy the Defender first before singling out the Isidas. Therefore, a much more complicated task force that can dislodge the tunnel in an overwhelming push is required.
If positioned correctly at the entrance of the tunnel, Melee turrets such as Firebirds or Freezes may cause large amounts of damage to both the Defender and Isidas due to the cone of splash damage. If using Freeze as the melee choice, a supporting Isida is generally recommended as Freeze can sustain damage over a much longer period without depleting its ammo. Firebird is also a good choice as its damage ramps up quickly due to afterburning, making Isidas much difficult to survive while supporting the Defender.
With a Railgun, it becomes possible to penetrate both the tunnel Defender and the supporting Isidas with one shot. The shot is usually done after the melee weapon has done a large amount (but not enough) damage to the enemy tunnel group. The burst shot gives a high amount of damage and can usually wipe out both the Defender and a supporting Isida at once, cleaning the tunnel much easily.
A thunder can also incline itself against the sloped walls on the edge of the tunnel and aim shots inside the tunnel. This causes splash damage to both the supporting Isidas and the Defender. However, such a move can be highly dangerous, as it is exposed directly to supporting enemy fire.
Beware that defending hammers may attempt to use their rounds with high impact force to knock off the aim of the assaulters, and in cases even flip them over. To mitigate this, the melee attacker can equip Titan over a medium hull, so that the knockback force becomes less significant. The Railgun can position itself behind the Melee attacker, so that it can penetrate shots accurately into the tunnel without having its aim knocked off.
Coordination and Protections
In a popular scenario that most can relate to, the Red team has 3 Thunders. The Thunders keep vigorous control of the point and dominate the game. In Blue team's chat, one suggests that people change to Emerald to take advantage of the 50% protection against Thunder. 3 people with Nanos then proceed to change their paint to Emeralds. Red counteracts by changing their Thunders to Ricochet, continuing their dominance over the game.
In an ideal case, the Red team should change its paints gradually so that the Blue team cannot counteract immediately using a different strategy.
This example shows us that coordination inside the Red team is poor, leading to overreactions.
When changing Turrets or Paints, express your desire in the team chat and ask for confirmation from others. Refrain from changing immediately as other teammates that do not respond in chat may also change their turrets. In this case it becomes unnecessary for you to do so.
When enemy campers become entrenched, your team may find it difficult to assault the control point. As a reader of this guide, you understand the dynamics of the battle and know that under this situation the best solution is to kill the campers before continuing. You can therefore guide your team by giving them strategical instructions, such as to focus on killing campers first.
General Strategies
- When using a ranged turret to attack a point with multiple enemy melee units, try to remain some distance by first shooting the enemies from afar, and only entering the point once most of them have been neutralized. For melee teammates without protection or significant health, this act might be suicidal. It is best to let other teammates receive attention and soak up some of the damage before sweeping in from another angle to deal damage.
- If equipping a melee turret on a heavy hull and you respawn on the island part of the map (opposite to the cliff area), you may want to self-destruct into the void, in order to find a better spawn point closer to the central area. If there are enemies nearby, try to pick a fight and time a self-destruct right after you deal the majority of damage onto them.
Madness Farming
See also: Crystals, Crystal boxes, Madness, Crystal Farms
Introduction
The second-fastest way to gain crystals in «ProTanki» is to engage in Madness Farming (The fastest being to purchase from the Shop). In Madness Farming, a small group of players (usually around 8) play battles where the goal is to destroy enemies as fast as possible. This in turn generates battle fund and crystal boxes which the players take themselves.
Terminology
In Madness Farming, a session of farm is called a Cycle or Circle. In a cycle, every participating player gets one round each. Rounds are battles that last 15 minutes, and all crystals and golds generated in that period are left to the player that is affiliated with the round (who can decide if they take it themselves, trade some of it with other players, or give it out to another player for free). Every player must commit to completing an entire cycle and play equally for all rounds, not just those that belong to them.
Lists determine the order in which players receive their rounds in a cycle. Players who are new or have worse karma (typically from sabotaging other player’s rounds, causing unfinished debt or inability to complete a full cycle) are usually placed last in the list, and the rest of the positions are usually randomized with a Random Number Generator. A list is usually prepared right after the roster of players are finalized.
Timeline
Starting Phase
Time
- 15:00 - 14:45
Playstyle
- Join the battle if you are still not in it.
- For TDM, you can join the team with less players to balance out the battle.
- For a new cycle, the List is usually generated at the start of the first round.
Shooting Phase
Time
From:
- 15:00
To:
- 3:30 (For Crystal Collector)
- 0:30 (Rest of the players)
Playstyle
- Do not hide nor camp and do not stay in the top zones. Players need to be killed actively to generate fund.
- Do not go to the ground if none of the Crystal or gold boxes belong to you. For public battles self-destruct or fall into a pit. For private battles you can re-join the game unless the battle is almost ending, and you are responsible for taking the battle fund.
- Do not use or pick up Med-Kit or Double Armor unless you are volunteering and will not take a round yourself.
- Try to avoid killing a player in the enemy team solely by yourself. Instead, try shooting as many enemies as you can. In TDM, when multiple teammates assist in destroying an enemy tank, the battle fund increases by 50%.
Collecting Phase
Time
From:
- N/A (To players that will not take any crystals during the round)
- 3:30 (For Non-trading, Crystal Collectors)
- 2:30 (For Trading, Crystal Collectors that do not take the top)
- 1:30 (For Trading, Fund Takers that only take the top / Gold collectors)
To:
- 0:15 (Collectors that do not take fund)
- 0:00 (Collectors that also take fund)
Playstyle
- Here the sole objective is to take crystals boxes. There is no need to shoot at others while collecting, as that will only slow you down.
- Announce that you are collecting in Chat and take full drugs to protect yourself from other players and speed up the collecting process.
- Follow pre-planned routes to maximize efficiency during collecting.
- For players that are new to farming or have network issues, start collecting 30 seconds earlier.
- For collectors that will not also take the battle fund, consider rejoining the battle on the team of the fund taker before collecting if it is private. As you are at 0 score/kills, you can collect up to the end of the battle without having to worry about missing the timer to rejoin.
End
Time
- 0:30 (Private battles)
- 0:15 (Public battles)
When to NOT leave/rejoin the battle
- If you will take the battle fund
- If you are playing a public TDM battle. Here you should close the game window instead of leaving the match. There is a two-minute cooldown that allows your spot to be occupied so that random players cannot hijack in, even when you are not physically present in the battle.
Playstyle
- After rejoining, you are not allowed to shoot at anyone, but you are allowed to take up any remaining crystal boxes that the collector has forgotten to take (Usually near the top)
- In TDM, always join the team that the fund-taker is in, so that no fund will be split to the other team and wasted.
- It is a good practice to type “timer” in chat at the 30 second threshold to remind other players to rejoin the battle.
Equipment
To maximize crystal yield, players must use the following equipment in battle. Players will be asked to change their equipment or leave the battle if they cannot confine with the standards.
Turrets
Main article: Turrets
The idea is to pick a turret which has a good range, is easy to aim and has the highest DPS. Thunder and Smoky are the most popular, but players are free to choose one of the following weapons below:
An additional rule in Private battles is that players are not allowed to have more than approximately 25% (this number was never verified) Tier 2 weapons comprising the total turrets distribution. This will cause the battle fund to not grow as fast as normal. For an 8-player battle, no more than 2 people can take Railgun and Shaft. For a 5-player battle, the allowance limit shrinks down to 1.
Hulls
Main article: Hulls
The idea is to pick a medium hull that has the lowest amount of HP. Whether it is an M0 or M3 does not matter, just pick one with the least amount of HP. This helps other players destroy you quicker allowing for more fund.
The most popular choice is Hunter due to its less-than-average HP, height, and stability. Its speed is also an excellent choice during collecting, making a change in hulls unnecessary. Do not take Wasp or Hornet as they generate 20% less fund than any other Hull.
Paints
Main article: Paints
Do not use any paint with protection against any of the turrets listed above unless you are using a low-HP/low-level hull and find yourself dying too fast to be able to shoot back properly. In this case, you are allowed to pick a paint that gives moderate protection.
Creating a Battle
Battle Settings
Main article: Battle Settings
The following settings must be manually configured in a Madness Battle:
- Usually TDM as battle mode
- PRO-Battle ON
- Autobalancing OFF
- Private battle ON
And the following settings do not need to be changed:
- Max team size of 16
- Rearm, Crystal Boxes, Extra Boxes and Supplies ON
- 15-minute battles with no ending condition
- No Special Formats
- No Friendly Fire
Sometimes, battles may be held in public which allows players to complete Missions. The following settings will be altered:
- DM as battle mode, if the number of players participating is not an Even number, otherwise TDM
- Private battle OFF
- Max Players as the number of players / Max team size as the number of players divided by 2
Rank Brackets
Main article: Rank Brackets
Players with a wide discrepancy in ranks can still play in the same battle, provided their ranks fit within a common Rank Bracket.
The largest rank bracket consists of Major to Generalissimo, and these battles can be created by players above Marshal Rank. Smaller rank brackets can be made for players below Major Rank, but higher ranks may not be able to join the battle, which decreases the amount of battle fund.
Player Interactions
Trading
See also: Premium account
If a player has Premium account activated at the end of a battle, they will gain 2x the crystals from the Battle fund as bonus. Those that do not have Premium can ask to trade with another player who has Premium, and in such case the player without Premium takes the bottom crystal boxes for both rounds, and the player with Premium takes the doubled battle fund as well as the crystal boxes on top for both rounds. This presents a commensalistic relationship where the player without Premium receives more crystals while the player with Premium loses nothing.
A player can also take another’s player golds if they mutually agree to compensate accordingly to the original player’s wishes.
Debt and Unfinished Business
Sometimes, either by loss of tank control, networking issues, miscommunication or by lack of attention, a player takes crystals that are supposed to be taken by another player. If the amount taken away is significant enough (500+ crystals in value), then the amount that is lost by the original player will be logged as debt where re-payment is expected unless when it is waived by the original player.
If a player leaves in the middle of their round, the fund and other crystals will most likely be split amongst the players in the map and the battle will not be counted.
Volunteering
Volunteers, unlike Players, do not take their round but still play and increase funds as if they are a normal player. They are not required to play the full cycle and can help whoever they want. They do not expect compensation but can be given if players are grateful for their assistance.
You may consider volunteering if you want to complete your daily missions but don’t have the time to go through an entire cycle. The battle will be in public for this matter.
Relevant Game Rules
Madness farming, although not explicitly prohibited, lies in a grey zone, and some players may inadvertently or deliberately violate Game rules in order to gain an unfair advantage.
We would like to remind you once again to abide by the following Gameplay-related rules during your grinding experience:
- 2.1.1 Inactivity for more than 5 minutes and not allowed more than twice in a row in team battles is prohibited.
* Penalty: Kick.
- 2.1.2 Passive game behavior - the user is strictly forbidden to show full or partial "passive" behavior. This behavior means the user`s behavior that does not comply with the rules of the game modes (interfering with the team, taking a place in the battle, taking crystal boxes without participating in the main stage of the game mode).
* Penalty: Kick, blocking of the account from 1 hour to 1 day for the first offense.
- 2.1.3 Actions aimed at causing interference to the team for which the user is fighting in team modes (sabotage) are forbidden. Among the following actions are considered to be sabotage: fighting against one`s own team, intentionally choosing weak weapons, frequent pauses, simulating problems with the Internet connection, fighting in the interest of the opposing team (collusion), being in the battle from several accounts*, intentionally ignoring opponents, alliances and so on.
- Multaccounting - it`s forbidden to have several accounts of the same player in the same or different battles at the same time. (Applies to all game modes, except for "Parkour")
* Penalty: Kick, blocking of the account from 1 hour to 1 day for the first violation.
- 2.1.4 Pumping is prohibited. By pumping we mean, among other things: collusion, leading to a significant advantage in favor of one of the teams in team modes; battle between accounts of the same user; battle with players who collect crystals and do not hit back;
* Penalty: Kick, blocking of the account from 1 hour to 1 day for the first offense.
Alternate Kit Progression
M1
Instead of picking Knight + Piranha we could pick something like Die Hard + Matrix. The former option gives you an edge in Madness thanks to Shaft, and the latter more so in Polygon.
This is a common starting point for the alternate Kit Progression, which has many branches and diverges significantly at the onset of M2 equipment.
The protections that Cedar and Pixel offer also give upgrades than those you would normally obtain from Chainmail + Corrosion, with the exception of Shaft - which is less relevant given Viking's ability to withstand a full sniper shot.
M2
With Die Hard + Matrix games become more difficult especially when facing early M2 ranks. By taking the Firebolt kit we can give ourselves a strong boost. Even though Firebird M2 and Wasp M2 is objectively undesirable, we obtain Rustle early on and do not need to take Fortress. Then, as we already have Fire and Wasp, we skip Avalanche and obtain Boar and Cyclops instead, and separately purchase Thunder M2 at Captain.
Blacksmith has a way better protection synergy against all long ranged weapons than Graffiti, which lacks Railgun protection. It is still highly popular in M3 ranks and is sustainable. Besides, having Blacksmith removes the need for Winter, which causes overlaps in protections particularly in Firebird and Thunder.
M3
The progression in M3 mainly follows that outlined in the main article, but some changes are made and justified below:
With Fire M2 unlocked we can directly purchase its M3 version from the garage (You can already purchase Fire M3 separately when unlocking Pyromancer), so we can instead invest in Cardinal for Twins M3 and Picasso paint (Which complements well with Blacksmith as one protects against Thunder and the other against Vulcan).
With us not having Freeze at all we need to purchase it from a kit. Luckily for us, by obtaining Twins M3 we do not need to take the Twins and Viking M3 kit, which gives us more options. Unfortunately Freeze M3 only comes in Boreas and Fridge, and both paints are relatively bad options, as Taiga is too similar to Spark in protections, and Hive's protection combination does not synergize well in most maps other than medium-sized ones like Polygon.
One option is to swap out Touche for Stonecutter and then supplement in Boreas, obtaining Jade instead of Prodigi. This gives a boost to Shaft protection but removes any decent Railgun protection capping the max at 27%. However, Prodigi can be purchased separately at General rank, but Jade can only be unlocked at Generalissimo.
Another option is to directly take Fridge kit with Hive which swaps Taiga for Hive.