Crystal Farms
See also: Tips and Guides, Crystals
| NOTE |
|---|
All information in this article is subject to constant change, for the following reasons:
|
Introduction
In «ProTanki» there are some particular methods to quickly accumulate a large sum of crystals, which are an essential currency in the game economy. All of these methods have a point in common, in which battles with a high Fund Multiplier are played in. Concisely, the most efficient way for farming crystals in a short period of time would be to play in a Capture the Flag battle in a small map and a large number of flags set as the win condition, with PRO Battle enabled and supplies disabled. However, there are numerous other methods that are also highly effective, and these will be documented in the following sections.
Why PRO Battles?
See also: Battle
There are many settings that can be toggled in a PRO Battle which might increase the amount of Battle Fund for players. Such restrictions are usually not available in normal battles and so the player should purchase a PRO Battle Pass to enter them frequently.
- Supplies: They are usually disabled in farming battles, as the usage of Double armor and Repair kits slow down the destruction of tanks which reduce the accumulation rate of battle fund.
- Bonus boxes: Same as above.
- Crystal boxes: Whether crystal boxes should be enabled or not varies depending on the current map. In many situations, maps with many drop locations for crystal boxes, such as Madness, give farmers a lot of crystals upon collection. For smaller maps, it is more ideal to benefit from the 50% increased fund multiplier by disabling these boxes.
Factors to Fund Growth Rate
On average, the higher a player's rank, the greater the growth rate of the battle fund. This trend holds true across all ranks, with the battle fund in battles involving many Generalissimo players growing much faster than in those with many Recruits. Light hulls, when destroyed, typically yield less crystals than their medium and heavier counterparts. However, note that the level of hull destroyed does not influence the growth rate of battle fund, and destroying a Hunter M0 adds the same amount of crystals to the fund as Mammoth M3. However, be reminded that actively equipping weaker hulls will put you in a disadvantage compared to other players.
The fund multiplier for larger maps is also slightly greater than that in smaller maps.
Time Limit
Farming battles are usually very long, normally lasting 1 hours and some taking up to 999 minutes and may preemptively end due to the server restart at 00:00 Kyiv Time. Plan ahead your schedule whenever you enter a battle and be aware of its remaining time and refrain from joining if you are unavailable for the time period; You gain little to no crystals if you leave before the battle ends.
In longer battles, the battle fund can reach substantial amounts because many players can't commit to playing the entire duration. While it's certainly possible to secure a significant share of the battle fund by achieving a massive score through extended play, this approach demands a considerable investment of time and effort that not every player may have at their disposal. A more practical strategy is for players to join approximately three hours before the battle concludes, allowing them to gradually accumulate score. During this period, it's unlikely other players have been continuously active since the battle's start, resulting in the opportunity to earn more crystals with relatively less playtime.
Battle modes
Main Article: Battle modes
Farming battles in DM or TDM modes usually take place in large maps, and so typically a long-ranged turret is preferred, such as Railgun or Shaft. To increase survivability and sustain longer for accumulating kills, heavier hulls are usually equipped, which also has the side-effect of boosting the battle fund growth rate. The extra fund multiplier in Deathmatches is 10% while that in Team Deathmatches is 20%.
Farming battles in CTF usually take place in small maps. It is recommended to use a medium hull as it compromises between capturing more flags and destroying more enemies with higher armor, bringing the edges out of both fund-inducing factors. However, note that the extra fund multiplier for Capture the Flag battles is -10%.
Farming battles in CP usually takes place in medium maps. As every team's objective is to capture and control a point for as long as possible, your teammates and enemies will constantly concentrate near the point. Use a short-medium ranged turret that can deal a lot of damage to enemies in a short period of time and use heavy or medium hulls to survive the onslaught. You may use turrets with splash damage that may hit multiple targets at the same time.
Generally speaking, the strategy in crystal farming battles is usually similar to that in normal battles, albeit with some small changes and equipment combinations.
Maps
Main Article: Maps
Several maps are commonly chosen in crystal farming battles, and these can be seen all over the battle list. The following outlines the general strategy for them:
Polygon
Main Article: Polygon
A typical farming game in Polygon involves 8 Players from each team, contesting over the central area in the Control Points mode.
Typical Conditions
- Common: 100, 150, 200, 300 Points
- Range: Between 50 to 400 Points
Turrets to Avoid
- Shaft
- Railgun (An exception would be when the enemy team cannot be dislodged from the tunnel area)
Best Hulls
- Tier 1: Titan, Viking
- Tier 2: Mammoth, Dictator
- Tier 3: Hunter
Best Combinations
- Viking with short-ranged turrets
- Titan and Mammoth with medium-ranged turrets
Strategies
- Occupy the tunnel area with a heavy hull and a turret with high continuous damage, such as Hammer or Twins as defender. 1-2 Isidas should sit at the back of the tunnel protected by the defender, while constantly healing each other to ensure the team occupies the tunnel area. The defender is allowed to survive for extended periods of time, killing any enemy that approaches the point and holding it so that it does not get captured.
- If you encounter enemies using this strategy, you may use a turret with high burst damage, such as Railgun or Ricochet, to penetrate the tunnel and damage the healing Isidas. You may also gather multiple teammates to overwhelm the defender at the same time.
- Always prioritize enemies that have low armor, then those at or approaching the control point. Avoid shooting at enemies without ammo/energy, as they cannot deal any damage to your team.
- If you use a medium-long ranged turret, you may "camp" at the cliff under the large ramp to deal damage to as many enemies as possible. However, this reduces the number of players that are available for controlling and holding the point.
Island
Main Article: Island
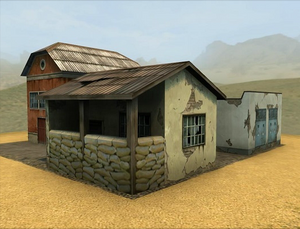
A typical farming game in Island involves 3 Players from each team, with the goal of capturing the most flags from the enemy team.
Typical Conditions
- 33, 35, 50, 77, 100 Flags
Best Turrets
- Tier 1: Firebird, Freeze, Isida, Hammer
- Tier 2: Twins, Ricochet
Best Hulls
Note: Due to poor handling, Dictator is usually not used in Island CTF.
- Tier 1: Viking, Hunter
- Tier 2: Titan
Best Paints
- Zeus, Inferno, Mars, Irbis, Rock, Spark, Taiga, Lumberjack, Nano
Strategies
- Ensure that at least 2 players on your team are using 2 of the Tier 1 turrets. They have the best performance in this map.
- While not considered the best combination, it is possible for players to equip a Tier 2 turret on Titan, making it easier to defend the flag from enemy assaults. However, the player compromises their mobility, and cannot attack the enemy base.
- It is recommended to have 1 Isida on your team, which can heal your team's flag carrier and prevent it from dying to concentrated enemy pursuits. Otherwise, use a Freeze to slow down enemies and prevent them from transporting your team's flag away.
- Avoid using the same turret as your teammates and watch out for protection combinations that the enemy's paints may have against your team. For example, it is not recommended to have a team using Firebird, Freeze and Twins, as the enemy can simply equip the Inferno paint which grants protection against all involved turrets.
- Attempt to kill at least 2 enemies while having 2 teammates alive in a short interval of about 2 seconds. This allows your team to hunt the remaining enemy player down with ease and capture the enemy flag.
- Always pre-equip best paints that can protect against turrets commonly used in this map. Switch paints only when necessary.
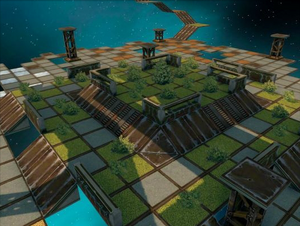
Arena
Main Article: Arena
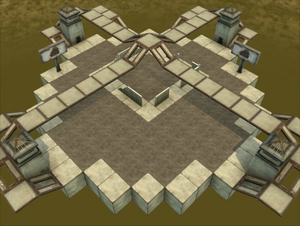
A typical farming game in Arena involves 4 Players from each team, contesting over the central area in the Control Points mode.
Typical Conditions
- 100, 150, 200 Points
Best Turrets
- Tier 1: Firebird, Freeze
- Tier 2: Hammer, Twins, Isida, Ricochet
Best Hulls
- Titan
- Mammoth
Best Paints
- Same as that in Island
Strategies
- Arena is a very small and compact map, so virtually everyone will be using a short-ranged turret with high damage output. In order to survive long enough such that you outlast your enemies, equip a hull with a lot of armor.
- Tier 1 turrets such as Firebird and Freeze have a cone that can deal splash damage to all enemies within it. Position your tank wisely so that the cone can simultaneously damage multiple enemies at once.
- You may also blocks enemies from entering the point by sitting on the entrance gates.
- Similar to the strategy in Island, avoid equipping the same turrets along with your teammates; Always attempt to diversify turret choices.
- If there are 2 Firebirds in the enemy team, use 2 Freezes. The freezing effect can nullify Firebird's burning damage, making it do less damage than Freeze.
- Avoid entering maps where the Crystal boxes option is enabled, unless you are absolutely certain all of your teammates prioritize team effort more than personal gains. As the battle rages on, crystal boxes will accumulate over the top of the map. When a selfish teammate goes up to collect the boxes, you will be left with a disadvantage in a 3v4 situation. However, this can also be the case for the enemy team.
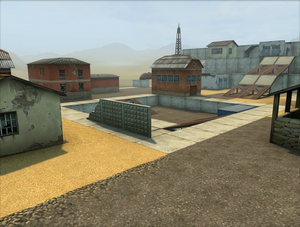
Stadium
Main Article: Stadium
Attention! Due to an update where Missions were reworked, "Mission Maps" are now obsolete and are do not help completing missions as efficiently as they once did. This has led to a stark decrease in popularity of Stadium battles.
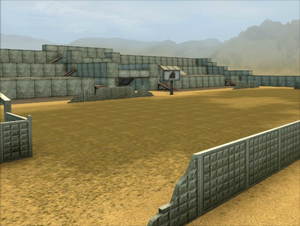
A typical farming game in Stadium involves 10 Players from each team, with the goal of capturing the most flags from the enemy team.
Typical Conditions
- 999 minutes
- 999 flags
- Until the daily server restart
Best Turrets
- Camping: Vulcan, Railgun, Shaft
- Mid-field: Smoky, Thunder
- Attackers: Isida, Hammer
Best Hulls
- Snipers: Mammoth, Titan
- Attackers/Mid-field: Viking, Hunter
Best Paints
- Picasso, Prodigi, Winter, Sandstone, Needle, Jade, Graffiti, Blacksmith
Strategies
For maps with a very long ending condition, only join the winning team around 3 hours before the battle will end. You will obtain a large portion of the heavily stacked battle fund.
Attacking Strategy
- Attempt to deliver the flag with the help of healing Isidas. Attackers should equip Viking and, less preferably, Hunter. Anything heavier will result in significant loss in mobility, while anything lighter will be easily destroyed by sniping shots.
- Take a safe route through a detour within your home base if the enemy team is very strong and has a lot of snipers. This way, you can travel across the field without being exposed to enemy snipers while receiving assistance from teammates.
- You may take the fast route directly across the field if enemy sniping fire is neutralized.
Defending Strategy
- Hide beneath ramps or behind walls during reloading, and only peek out to shoot when safe from enemy fire. This minimizes time of exposure to enemy snipers.
- You may attempt to block the gates to your team's flagpole from enemy attackers using heavy hulls. This forces a detour to the flagpole and buys time for defense.
- Coordinate with other snipers to land multiple shots on the enemy flag carrier at the same time. This destroys them before the supporting Isidas can start healing.
Madness
Main Article: Madness
A normal game in Madness involves 32 Players pitting against each other in the Deathmatch mode.
Typical Conditions
- 100, 111, 300, 500, 999 Kills
Best Turrets
- Tier 1: Shaft, Railgun, Vulcan
- Tier 2: Thunder, Smoky
- Tier 3: Ricochet
Best Hulls
- Normal: Mammoth, Titan, Viking
Best Paints
- Same as that in Stadium
Strategy
A typical Madness battle contains two types of Madness players:
- Collectors: These players use light or medium hulls to collect crystal boxes scattered across the base of the map. Farmers rarely engage in combat with other players, prioritizing crystal collection.
- Killers: These players equip heavy hulls and medium-long ranged turrets to kill other players.
For normal Madness battles, Supplies are usually enabled. This allows killers to destroy other players (mostly collectors) with ease, contributing more to the battle fund.
- As a killer, find a good camping position around the outskirts of the map and snipe other players with supplies on. You may get close to the center of the map for more kills, but this also increases the risk of being killed by revenging farmers. Alternatively, you may also team with other snipers and shoot players from the balcony at the top of the map.
- Keep in mind that turrets like Thunder, Smoky and Vulcan are less effective at longer distances, so shooting across the map is not efficient. Pick a target that is not out of the turret's maximum effective range.
- As a collector, equip a light or medium hull with high mobility. Drop down to the base of the map, and collect as many crystal boxes as possible by circling around it; Avoid getting into killers' line of sight, as they will shoot at you. You may also attempt to forge truces with killers, so that they exclusively kill other farmers and reduce competition for crystal boxes.
- Collectors can benefit from leaving the battle when heavily damaged. This allows you to respawn faster at another location to continue collecting crystal boxes, with the negligible cost of voiding any spare kills you had before (which should be minimal). This also signals to the killer that targeting you isn't worth their effort, leading them to focus on other farmers instead. However, if you find clusters of crystal boxes in front of you, it might be better to equip either a Double armor, Repair kit or Speed boost to sustain a longer period of time for collection.
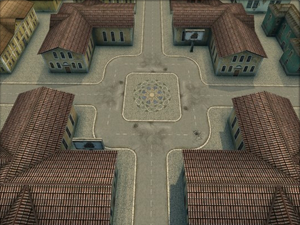
Dusseldorf
Main Article: Dusseldorf
A normal game in Dusseldorf involves 40 Players pitting against each other in the Deathmatch mode. It has many open spaces and is the largest map of the game, but contains many buildings and alleys as well.
Typical Conditions
- 77, 88, 100, 123, 150, 200, 300, 500 Kills
- 111 * n Kills
- Note: it takes about 30-35 minutes per 100 kills.
Best Turrets
There is no Best Turret for Dusseldorf, as your playstyle can change depending on the portion of the map you are located in.
- For Melee/Short-ranged turrets, consider lurking in the narrow alleys and damage unsuspecting enemies going through the center of the map.
- For Medium-Long ranged turrets, find a ledge for camping that overlooks a large open space near the outskirts of the map, or a spot that allows you to see through a long alley and damage enemies from afar.
Best Hulls
Similarly, there is no Best Hull for Dusseldorf. You can use whatever hull you like, as long as it does not contradict with the turret choice, and that you are able adopt your own playing style.
Best Paints
Unlike Madness, every type of turret can be played effectively on Dusseldorf. With the great number of players, it is certain that the turret choice for every player would be mostly different, and thus the more turrets a paint gives protection against the better.
Typically it is more difficult to deal with the many Railguns and Shafts than Firebirds and Twins, and thus anti-sniping paints should be equipped by default if you do not own any better paints.
- Tier 1: Premium paint, paints giving protection against 4 or more turrets
- Tier 2: Anti-sniping paints
- Tier 3: Other paints
Strategy
- Dusseldorf is famous for its Gold massacres, and Crystal Boxes is usually enabled to allow Gold boxes to drop. Since every Gold spawns in the central area, almost every player (apart from a few snipers looking for kills) will travel across the map to compete against you for the sweet crystal prize. To get a better chance at catching a Gold, you may refer to the following guide: Guide to catch Gold Box
- If you are certain that you cannot capture the Gold box, back out of the crowd and try to take a few frags from other players who are concentrated near the drop zone.